Ok, first of all, don’t give up! I had quite the adventure figuring out how to make this recipe work for me. Einkorn is a little different. I get it. It’s SO worth it! There’s a learning curve. Second, time and measurments are more about consistency than exactness. The truth is, I can’t tell you exactly how long this bread takes. It could be six hours; it could be twelve. It depends on a lot of variables.If you feel like your dough is taking a lifetime to rise, you’re probably not alone. So before you swear off natural leavening forever, please watch for my follow up post with tips about natural leavening. Although I can’t tell you exactly how to make it turn out perfectly the first time, I can give you some tips that may help minimize failures. So, let me tell you some of the things I learned on my fabulous adventure through the land of naturally leavened einkorn bread.Be sure to print the full sourdough recipe here.
The Perfect “Start”, Ready to Add to Bread Dough
Start – It’s all about that start! If the start isn’t right, you’re going to have trouble with the whole thing. For the perfect einkorn sourdough start, go here. It should look like this:
Water – This recipe may call for less water than you would think. Remember that einkorn is a very moist grain. Too much water will ruin it. So resist your instinct to overide the recipe in this one thing. Also, make sure the water is as hot as tap water can get. That way it will melt the coconut oil. Plus, adding all the other things will cool it down, and it still needs to be slightly warm for fermentation purposes.
Rising – You might be thinking, “I’m sorry, how many times does one batch of bread need to rise?” I know, I know. But, I found that this is the best way. We noticed that the start alone didn’t quite have the strength to raise the entire batch. So, we add half the flour and let it culture for a while (until it looks like a rootbeer float). Then add the remainder of the flour one cup at a time while mixing and it will have the power to rise like it should (double its size).
Dough In Bowl, Before Rising Risen Dough, Doubled in Size
Dough – The flour measurement is approximate. Add enough flour so that the dough pulls away from the sides and is soft but not sticky. It’s more important than ever to get the consistency right as soon as possible and STOP. Overkneading einkorn dough is bad news. It will be extremely difficult to get out of the mixing bowl. Also, when the dough has been placed in the bowl to rise, don’t forget to punch it down. That’s more important for fluffy bread than you’d think.
Close Up On “Spongy” Dough After Removing From Bowl
Salt – It’s better to add the salt with the second half of flour. Salt kills yeast. It’s ok when the dough is stiff, but it could be a slight hindrance in dough with only half the flour.
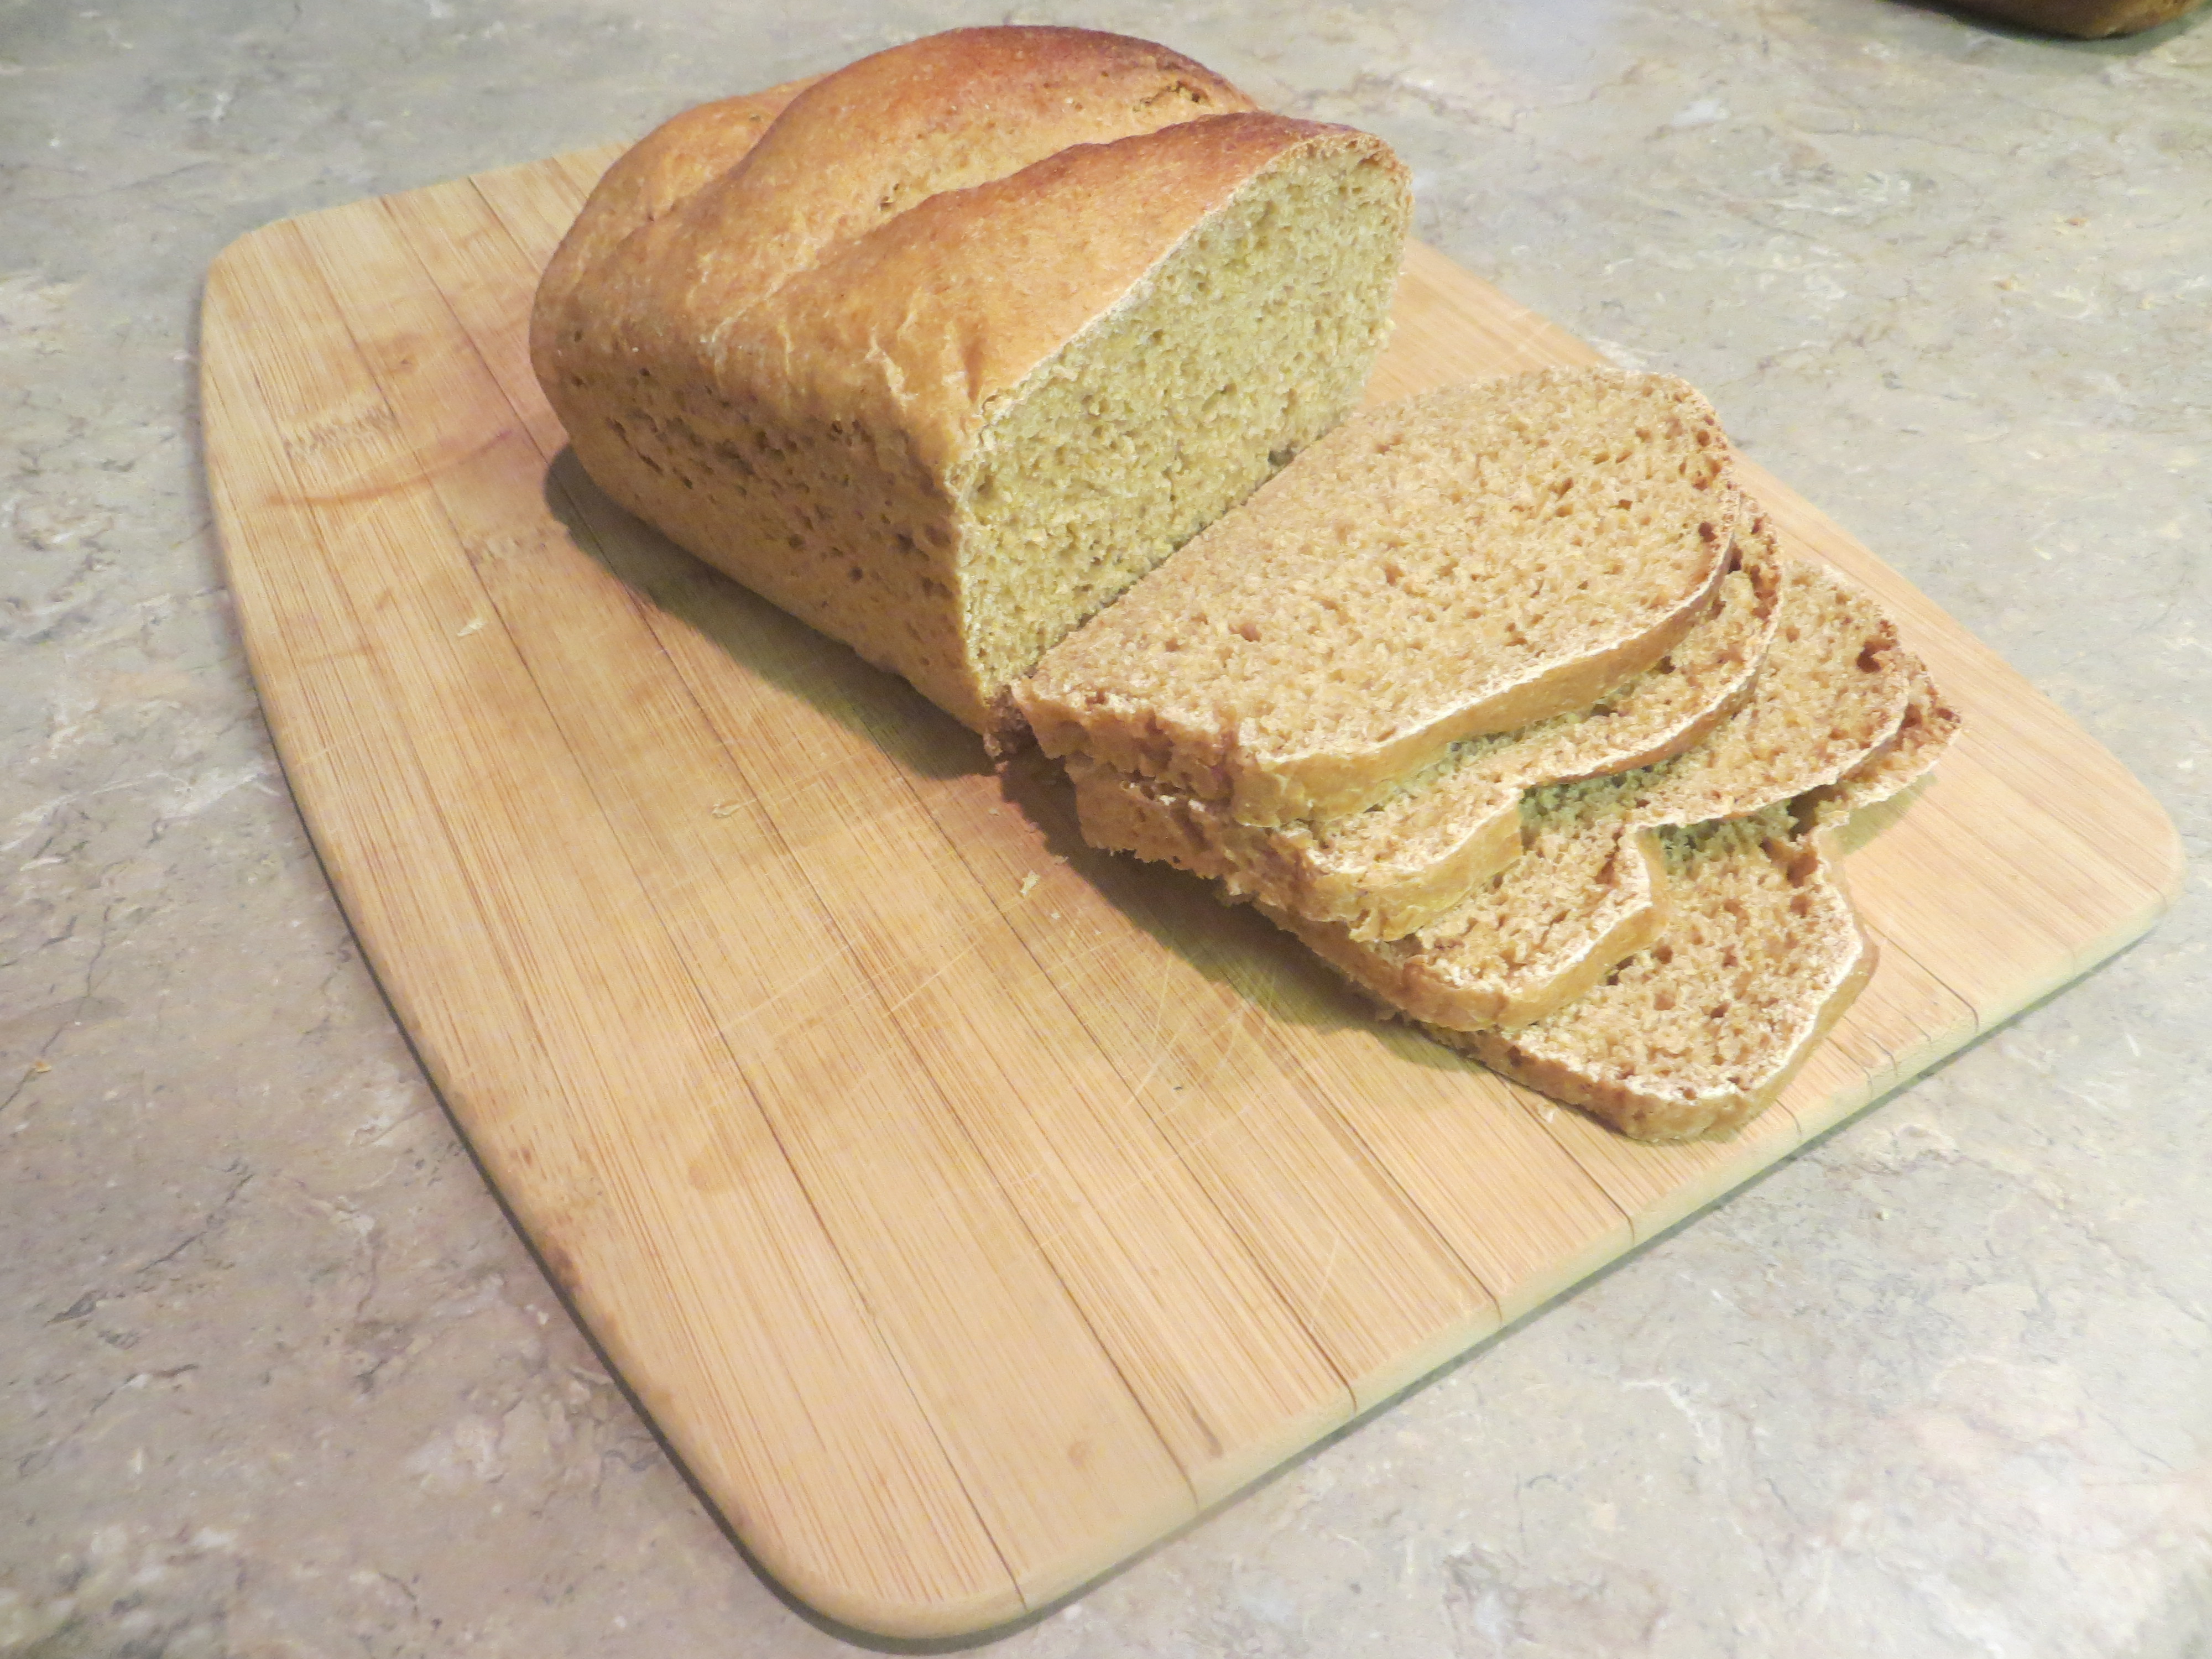
Loaves – This recipe makes about five loaves. You need to shape them, make three slitd in the top of each, and place in greased loaf pans.They look pretty, but the slits aren’t just for aesthetics. If you fail to make the slit, the bread will make its own and the top crust will separate from the bottom – not as pretty.
Golden Brown, Baking CompleteTime To Eat! So, there you are! Experiment, follow these steps, and expect success! It will be so rewarding when you master this. Happy dances are allowed. Deliciousness, digestion-friendly grain and leavening, better nutrient absorption. Is there a downside to this? There isn’t actually.
Ingredients
SCALE
4cupHot Tap Water
18cupEinkorn FlourApproximate
1/3cupCoconut OilOr butter
1/2cupHoney
3tablespoonReal Salt
2cupSourdough StartApproximate
Instructions
1. Mix water, oil, honey, and 1/2 the flour in a bowl.The Perfect "Start", Ready to Add to Bread Dough2. Add start (You should have previously fed the start with 2 cups of flour and 1 cup of water)3. Let rest until it begins to get bubbly (May take a couple hours, should resemble a rootbeer float...but probably not taste like one)4. Add salt and the remaining flour until it doesn't stick to your fingers and pulls away from the sides of the bowl (DO NOT over-knead it. It becomes extremely difficult to work with). You may not add all of the remaining flour or you may add more. It's all about the consistency.5. Transfer it to a bowl (Preferably glass or stainless steel), punch down, cover and leave to rise in a warm place (I recommend a slightly warm oven or my personal favorite, a wonder oven). Leave it until it doubles in size (several hours).Dough In Bowl, Before RisingRisen Dough, Doubled in SizeClose Up On "Spongy" Dough After Removing From Bowl6. Shape into 5 loaves about as long as a large orange juice can. Make three slits in the top of each loaf. Place into greased bread pans.7. Let loaves rise in oven until they double in size.Shaped Loaves, Ready to RiseRisen Loaves, Ready to Bake
8. When they have risen, leave them in oven and preheat it to 350° (with the loaves still in the oven). Preheating plus baking time should equal about 38 minutes depending on your oven.9. When they are golden brown, remove and brush coconut oil (or butter) on top.10. Enjoy!Golden Brown, Baking CompleteTime To Eat!
For a more detailed explanation go here.To see all the other things you can do with this awesome recipe, go here.
RELATED RECIPES
There’s something satisfying about using a single ingredient in so many different ways. Einkorn is incredibly versatile, and the recipes below make it easy to bring this ancient grain into your everyday meals. Here are a few to explore:
Julie Koyle co founded and has been the driving creative force behind Grand Teton Ancient Grains, a regenerative organic family farm and mill nestled at the base of the Grand Teton foothills in eastern Idaho….
Reviews
65 thoughts on “Naturally Leavened (Sourdough) Einkorn Bread”
MaryClare
I also have the same problem as Erika stated above. My dough took 7 hours for the first rise before i saw any bubbles. I could not get my dough to rise the second time. The bread was dense but still edible. I also thought by warm oven you meant my ovens lowest temp. 170 degrees. Did that ruin the rise? Please tell me what to do right before placing in loaf pans? Is the sourdough meant to be completely sticky and difficult to transfer? Was I supposed to add more flour and knead a bit again? I know there’s a learning curve, I’ve made other sourdough before and sometimes it didn’t come out. I’d just like to hear what I’m doing wrong. I hate to waste anymore of this good flour. Thanks!
Hi MaryClare, I apologize for the confusion. Yes, 170 degrees would probably be too hot for the rise. We usually just put it in our oven with the light on. Aside from that, it’s hard to know since I wasn’t there for the process. Dense bread that doesn’t rise can be a result of overflouring which is common with einkorn since it tends to be stickier. Sometimes it’s a good idea to let the dough rest for a few minutes before deciding if you should add more flour. Einkorn absorbs liquid more slowly than other grains. It’s ok (even though it’s a little frustrating) for einkorn dough to be a little sicky. We usually just oil our hands a little bit when working with it. I hope that’s helpful!
Hello,
I’m a newbie and have a few questions also:
1. After you use all the start to make bread (leaving a Tablespoon for new start), how many days do you need to feed that new start before it’s ready to bake again? Another 5-7 days? Or just until you accumulate 2 cups worth? Is it time-dependent or could you simply feed it a bigger amount and it’s ready the next day?
2. On step #5, “transfer to a bowl”, I’m already in a big bowl from step #1. Why is it necessary to change bowls? Is there a downside to keeping it in the same big bowl?
3. On step#2, “you should have fed previously fed the start with 2 cups flour and 1 cup water”, fed WHEN previously? Immediately before? Or the day before? Your starter culture recipe has me feeding 120g flour, which is only 1 and 1/3 cup. So why the switch to 2 cups? Is the ratio (double) what’s important, and not the amount?
Thanks very much!
Amy P.
Hi Amy, I would be happy to answer your questions as best I can.
1) Once the start is created and ready to use, we leave a small amount in a jar in the refrigerator until the night before we want to use it. Then we transfer it to a bowl and feed it with two cups of flour and one cup of water. Then, we leave it on the counter overnight and it is ready to use in the morning.
2) This part of the recipe is when we transfer the dough from the mixer into a bowl that we’re going to leave on the counter to let the sourdough ferment the dough.
3) See answer 1. We keep it in the refrigerator and feed it the night before we’re going to bake with it. And yes, it is the ratio that’s important not the exact amount. The less there is, the faster it ferments. We’ve found that if we’re going to bake bread with it the next morning, 2 cups of flour and 1 cup of water is the best amount to leave overnight so that it’s ready in the morning and hasn’t gone too far.
Hi! Is it possible to get gram measurements for all ingredients in the recipe? I’m in the habit of using my kitchen scale to weigh my grain before I mill it. Thank you!
Hi Dawn, we may move that direction in the future, but it is a pretty big undertaking considering we never weigh our ingredients. I would suggest making the recipe as we have outlined and weighting as you go so next time you can do it that way. I apologize for not having that information available.
Hi Sarah, it depends on the recipe. For our sourdough bread recipe you need to feed it with 2 cups of flour and 1 cup of water. However much you feed it, we suggest using that ratio, half as much water as flour.
Unless you’ve noticed a problem with the distribution of heat, this is most likely not necessary for your oven. We had a major problem with things in our oven not baking evenly.
hi please if possible can you respond as quick as possible as I’m just starting this recipe to serve this afternoon and have come up again confusion before i start! I have bought a sourdough starter from my local bakers and was about to use it then saw this on the recipe…… Add start (You should have previously fed the start with 2 cups of flour and 1 cup of water) …..so am i to feed the start i bought now with 2 cups flour and 1 water and use it immediately or do i have to wait until it looks like the bubbling picture, in which case how long does this take approx? Desperate to get started asap I have all the ingredients in the bowl ready! Many thanks Jo
Joanne, we apologize for not responding over the weekend. Sourdough is definitely not an exact science. It’s all about consistency. The starter needs to be bubbly before use or the bread probably won’t work. I don’t know in what state the starter you bought arrived. If it’s not like that, you will need to wait until it is. The time it takes depends on a lot of factors, but usually overnight will do it. If the starter is already in that condition, you don’t need to feed it before using it. It ends up being about two cups of starter in this recipe. Our process is like this: After we use our starter, we just feed what’s sticking to the sides of the bowl two cups of einkorn flour and one cup of water. Then we leave it over the night. The next morning, to make bread, we dump the whole starter into the recipe and feed what’s sticking to the sides of the bowl again. That’s why we say use the whole thing. If you fed it more than that, just use about two cups. I hope this helps.
It depends how much you want to culture. If you’re trying to do a larger amount in the same amount of time, you may want to use a little more starter, but it shouldn’t really affect the strength.

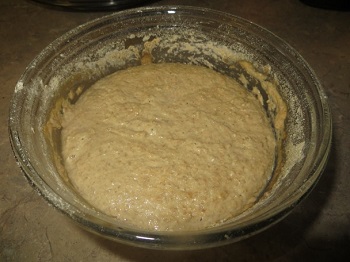
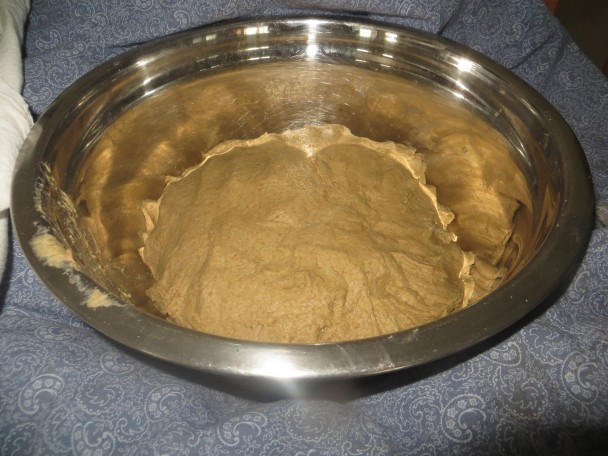 Dough In Bowl, Before Rising
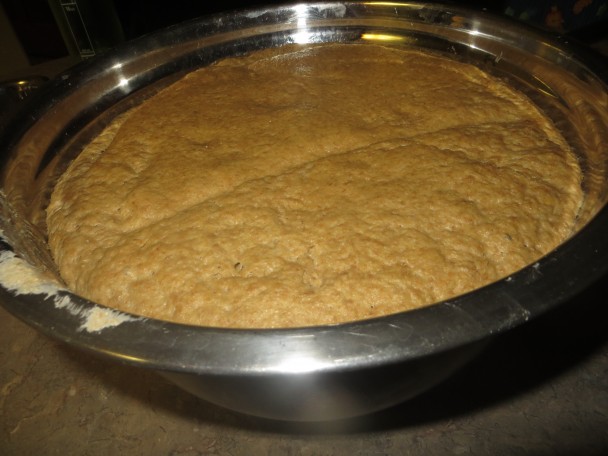
 Close Up On “Spongy” Dough After Removing From Bowl
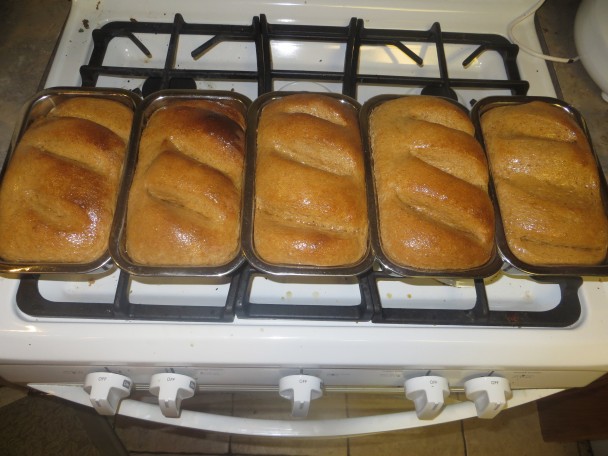 Golden Brown, Baking Complete
 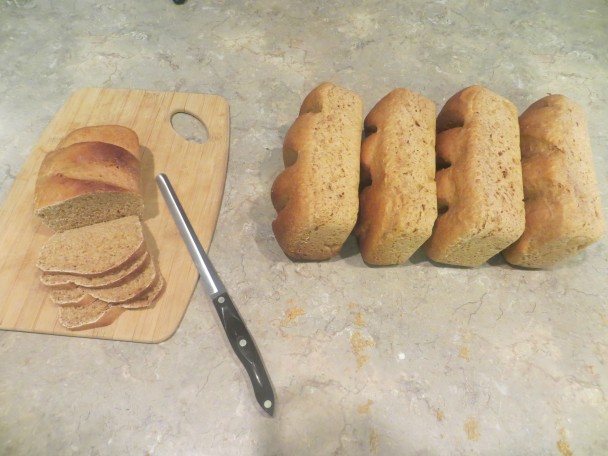 Time To Eat!

![IMG_1212[1]](https://www.einkorn.com/wp-content/uploads/2015/01/IMG_12121-608x456.jpg)


65 thoughts on “Naturally Leavened (Sourdough) Einkorn Bread”
I also have the same problem as Erika stated above. My dough took 7 hours for the first rise before i saw any bubbles. I could not get my dough to rise the second time. The bread was dense but still edible. I also thought by warm oven you meant my ovens lowest temp. 170 degrees. Did that ruin the rise? Please tell me what to do right before placing in loaf pans? Is the sourdough meant to be completely sticky and difficult to transfer? Was I supposed to add more flour and knead a bit again? I know there’s a learning curve, I’ve made other sourdough before and sometimes it didn’t come out. I’d just like to hear what I’m doing wrong. I hate to waste anymore of this good flour. Thanks!
Hi MaryClare, I apologize for the confusion. Yes, 170 degrees would probably be too hot for the rise. We usually just put it in our oven with the light on. Aside from that, it’s hard to know since I wasn’t there for the process. Dense bread that doesn’t rise can be a result of overflouring which is common with einkorn since it tends to be stickier. Sometimes it’s a good idea to let the dough rest for a few minutes before deciding if you should add more flour. Einkorn absorbs liquid more slowly than other grains. It’s ok (even though it’s a little frustrating) for einkorn dough to be a little sicky. We usually just oil our hands a little bit when working with it. I hope that’s helpful!
P.S. My starter has been on the counter for 7 days “growing”, not refrigerated.
Hello,
I’m a newbie and have a few questions also:
1. After you use all the start to make bread (leaving a Tablespoon for new start), how many days do you need to feed that new start before it’s ready to bake again? Another 5-7 days? Or just until you accumulate 2 cups worth? Is it time-dependent or could you simply feed it a bigger amount and it’s ready the next day?
2. On step #5, “transfer to a bowl”, I’m already in a big bowl from step #1. Why is it necessary to change bowls? Is there a downside to keeping it in the same big bowl?
3. On step#2, “you should have fed previously fed the start with 2 cups flour and 1 cup water”, fed WHEN previously? Immediately before? Or the day before? Your starter culture recipe has me feeding 120g flour, which is only 1 and 1/3 cup. So why the switch to 2 cups? Is the ratio (double) what’s important, and not the amount?
Thanks very much!
Amy P.
Hi Amy, I would be happy to answer your questions as best I can.
1) Once the start is created and ready to use, we leave a small amount in a jar in the refrigerator until the night before we want to use it. Then we transfer it to a bowl and feed it with two cups of flour and one cup of water. Then, we leave it on the counter overnight and it is ready to use in the morning.
2) This part of the recipe is when we transfer the dough from the mixer into a bowl that we’re going to leave on the counter to let the sourdough ferment the dough.
3) See answer 1. We keep it in the refrigerator and feed it the night before we’re going to bake with it. And yes, it is the ratio that’s important not the exact amount. The less there is, the faster it ferments. We’ve found that if we’re going to bake bread with it the next morning, 2 cups of flour and 1 cup of water is the best amount to leave overnight so that it’s ready in the morning and hasn’t gone too far.
Hi! Is it possible to get gram measurements for all ingredients in the recipe? I’m in the habit of using my kitchen scale to weigh my grain before I mill it. Thank you!
Hi Dawn, we may move that direction in the future, but it is a pretty big undertaking considering we never weigh our ingredients. I would suggest making the recipe as we have outlined and weighting as you go so next time you can do it that way. I apologize for not having that information available.
What is the amount of the one feeding you said for after the starter is taken out of the fridge ?
Hi Sarah, it depends on the recipe. For our sourdough bread recipe you need to feed it with 2 cups of flour and 1 cup of water. However much you feed it, we suggest using that ratio, half as much water as flour.
Why is there a stone in the bottom of your oven? Does that help with cooking the bread?
Hi Sarah, we use that to distribute the heat evenly because we have a gas oven. It is not required.
I have a gas oven also. Mine is a convection oven. Do you think I should get a stone?
Unless you’ve noticed a problem with the distribution of heat, this is most likely not necessary for your oven. We had a major problem with things in our oven not baking evenly.
Five (5) loaves of bread at one time is a lot for use. Can the loaves be frozen?
Hi Dana, yes the loaves can absolutely be frozen. 🙂
hi please if possible can you respond as quick as possible as I’m just starting this recipe to serve this afternoon and have come up again confusion before i start! I have bought a sourdough starter from my local bakers and was about to use it then saw this on the recipe…… Add start (You should have previously fed the start with 2 cups of flour and 1 cup of water) …..so am i to feed the start i bought now with 2 cups flour and 1 water and use it immediately or do i have to wait until it looks like the bubbling picture, in which case how long does this take approx? Desperate to get started asap I have all the ingredients in the bowl ready! Many thanks Jo
Joanne, we apologize for not responding over the weekend. Sourdough is definitely not an exact science. It’s all about consistency. The starter needs to be bubbly before use or the bread probably won’t work. I don’t know in what state the starter you bought arrived. If it’s not like that, you will need to wait until it is. The time it takes depends on a lot of factors, but usually overnight will do it. If the starter is already in that condition, you don’t need to feed it before using it. It ends up being about two cups of starter in this recipe. Our process is like this: After we use our starter, we just feed what’s sticking to the sides of the bowl two cups of einkorn flour and one cup of water. Then we leave it over the night. The next morning, to make bread, we dump the whole starter into the recipe and feed what’s sticking to the sides of the bowl again. That’s why we say use the whole thing. If you fed it more than that, just use about two cups. I hope this helps.
Do you think the less starter you use to make your next batch the stronger? Like why not 1/2 c of starter to start your next batch. Is less better?
It depends how much you want to culture. If you’re trying to do a larger amount in the same amount of time, you may want to use a little more starter, but it shouldn’t really affect the strength.